Healthy tropical bromeliad plant with colorful leaves thriving indoors
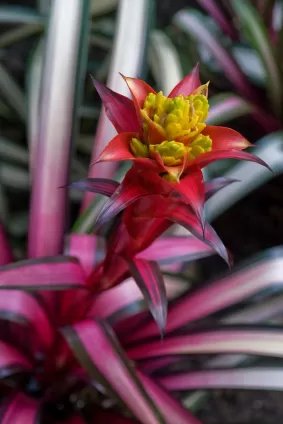
The vibrant display of a bromeliad bloom is a breathtaking sight, transforming your plant from attractive foliage to a stunning center piece. However, unlike many houseplants, most bromeliads flower just once in their lifetime. While this single bloom is glorious, it also signals the beginning of the end for the parent plant. But don’t despair! Before the original plant fades, it produces new life in the form of “pups.” Waiting for these pups to mature and bloom naturally can take years, sometimes three or more. Thankfully, there’s a clever trick gardeners use to encourage these young plants to flower much sooner.
Here’s what you’ll learn about encouraging that spectacular bromeliad bloom:
If you’ve ever admired a bromeliad in full glory at a garden center and wondered how they get them looking so spectacular, or if you’re patiently tending a pup hoping for its first bloom, you’re in the right place. Getting your bromeliad pup to produce that eagerly awaited bloom is a rewarding part of the gardening journey, and often, it just needs a little nudge.
Contents
When you purchase a bromeliad showcasing its spectacular color, you’re likely buying a plant that has already been “forced” to bloom by the nursery. Growers do this because the vibrant inflorescence and colorful bracts are what attract buyers. You get to enjoy this stunning display for several months as it slowly fades. This bloom is the peak of the parent plant’s life cycle. Once the bloom is finished, the parent plant has completed its mission and will begin to deteriorate.
But nature has a plan for continuation! Before the parent plant dies back, it produces smaller clones of itself called offsets or “pups” around its base. These pups are genetic duplicates, meaning they have the potential to produce the same beautiful bloom as the mother plant. The waiting game begins here. While these pups will eventually mature and bloom on their own, this can take a significant amount of time, often several years depending on the variety and growing conditions.
You have a choice with pups: you can either leave them attached to the mother plant to form a clump, or you can remove and repot them individually. If you choose to separate, it’s generally best to wait until the pup is at least one-third the size of the mother plant. Waiting until it’s closer to half the mother’s size increases the pup’s chances of successful establishment. If you leave them attached, simply trim away the old mother plant once it becomes unsightly.
Once separated and repotted (or simply grown larger alongside the parent), the pup needs time to establish a healthy root system and grow. This maturation period can take anywhere from several months to over a year. Only when the pup is mature and well-rooted is it ready for you to encourage its first bromeliad bloom.
“Forcing” a bromeliad to bloom means using specific techniques to trigger flowering before the plant would naturally do so. This is exactly what commercial growers do to time blooms for sales, and it’s a simple process you can replicate at home to enjoy that spectacular bromeliad bloom sooner rather than later. The key ingredient in forcing is ethylene gas.
One of the easiest and most popular methods for forcing a bromeliad bloom at home is the “apple in a bag” technique. It leverages the natural production of ethylene gas by ripening fruit.
You should begin to see signs of a developing bloom, such as colorful bracts or the emergence of the inflorescence spike, within 6 to 14 weeks after removing the bag. Patience is key during this waiting period!
For those looking for a slightly faster or more reliable method, commercial products containing ethefon are available. Ethefon is a liquid that releases ethylene gas when mixed with water. While professional growers often use pure ethylene gas, liquid ethefon products are more suitable for home gardeners.
These products vary in concentration, so always follow the manufacturer’s instructions precisely for dilution and application. It’s best to mix only the amount you need, as the active ingredient degrades quickly once diluted – typically within four hours.
You can apply the ethefon mixture in a couple of ways:
The advantage of using a chemical product is that you skip the 7-10 days needed for the apple method. The bloom should still appear within 6 to 14 weeks after application.
Before attempting to force a bromeliad bloom, a few conditions should be met to maximize your chances of success:
Avoid fertilizing your bromeliad for at least two weeks before you intend to force the bloom, and continue to hold off on fertilizer until about two weeks after the bloom begins to emerge. Consistent night temperatures are also important; they should ideally remain above 65°F (about 18°C) during the forcing period.
Keep in mind that not all bromeliad species respond equally to forcing. Some varieties are more easily triggered than others, and the timeline for bloom development can vary. Genera such as Guzmania, some Aechmea, and Vriesea are generally known to respond very well to forcing techniques. Don’t be discouraged if one type takes longer or requires a second attempt; it can sometimes involve a bit of trial and error.
If you’ve been patiently waiting for a natural bromeliad bloom without success, your fertilization habits might be a factor. Over-fertilizing, particularly with fertilizers high in nitrogen, can actually inhibit flowering. Nitrogen encourages vegetative growth – more leaves and pups – but can signal to the plant that conditions are so favorable it doesn’t need to reproduce via flowering yet.
Some experts recommend using a fertilizer blend that is lower in Nitrogen and higher in Phosphorus and Potassium to help encourage blooming. A ratio like Nitrogen 3.0, Phosphorus 8.0, and Potassium 25.0, often including trace elements, is sometimes suggested to put just enough “stress” on the plant to trigger the flowering process more quickly.
People force bromeliad blooms for various practical and aesthetic reasons:
Whatever your motivation, forcing a bromeliad bloom is a straightforward process that requires minimal effort – often just an apple or a simple chemical solution – and a bit of patience. With these techniques, you can potentially see a bloom on your mature pup in a matter of months instead of years.
Have you tried forcing your bromeliad to bloom? Which methods have worked best for you? Share your experiences in the comments below! If you found this guide helpful, please share it with other plant enthusiasts!
Wichtigste Erkenntnisse: Der Anbau eigener gemischter Blattsalate bietet unübertroffene Frische und Geschmack – direkt aus…
Here's how implementing no-dig techniques can transform your container gardening: Build Richer Soil: Layers of…
Healthy soil is teeming with beneficial microbes that act as a natural defense system for…
Transform your patio into a vibrant, wildlife-friendly oasis. Discover how to create beautiful, low-maintenance container…
Unlock the secret to a beautiful, resilient garden with Sedum & Yarrow blends. Discover why…
Beat the Heat: Discover resilient perennials that thrive in containers during the hottest summer months,…