Growing your own herbs is incredibly rewarding, and rosemary is a favorite for many. Its fragrant needles and versatile use in cooking make it a garden staple. But did you know you can easily expand your rosemary patch for free? Propagating rosemary from cuttings is a simple, cost-effective way to get new plants, and it’s much easier than you might think! You don’t need fancy equipment or expensive rooting hormones; often, just water and a little patience will do the trick. Let’s dive into how you can turn a snip from an existing plant into a thriving new bush.
Here’s what you’ll learn:
- Why propagating rosemary is simple and rewarding.
- How to select the best cuttings for success.
- A step-by-step guide to water propagation, perfect for beginners.
- Tips for caring for your new rosemary plants.
Why Propagate Rosemary?
Beyond the sheer joy of creating new life, propagating rosemary offers fantastic benefits. It’s incredibly economical – why buy new plants when you can get them for free from one you already have? It’s also a great way to save a favorite plant if it’s getting old or struggling, by creating healthy new clones. Plus, sharing cuttings with friends is a wonderful way to connect with fellow gardeners! Whether you’re pruning your existing bush and hate to waste the clippings, or you’re starting fresh, learning how to propagate rosemary is a valuable skill.
Understanding Rosemary (Rosmarinus officinalis)
Before we dig into the propagation steps, let’s quickly touch on the plant itself.
- Scientific Name: Salvia rosmarinus (formerly Rosmarinus officinalis)
- Common Name: Rosemary
- USDA Hardiness Zones: Typically 7-10 (can vary by cultivar and protection)
- Light: Full sun (at least 6-8 hours daily)
- Humidity: Prefers lower humidity, good air circulation is key.
- Water: Drought-tolerant once established; allow soil to dry out between waterings.
Understanding its needs helps you choose the right location for your mother plant and, eventually, your new cuttings.
Choosing and Taking the Right Cuttings
Success in propagation starts with selecting healthy material. You want to choose vibrant, non-flowering stems from a vigorous parent plant.
Look for what are called ‘softwood’ or ‘semi-hardwood’ cuttings. Softwood is new, flexible growth from the current season, usually found near the tips. Semi-hardwood is slightly older growth that is beginning to stiffen but hasn’t become fully woody. These types tend to root more easily than mature, woody stems.
Step 1: Select Healthy Shoots
Identify vigorous, green, and flexible shoots on your rosemary plant. These represent the best chance for successful rooting. Avoid stems that look weak, diseased, or are flowering heavily.
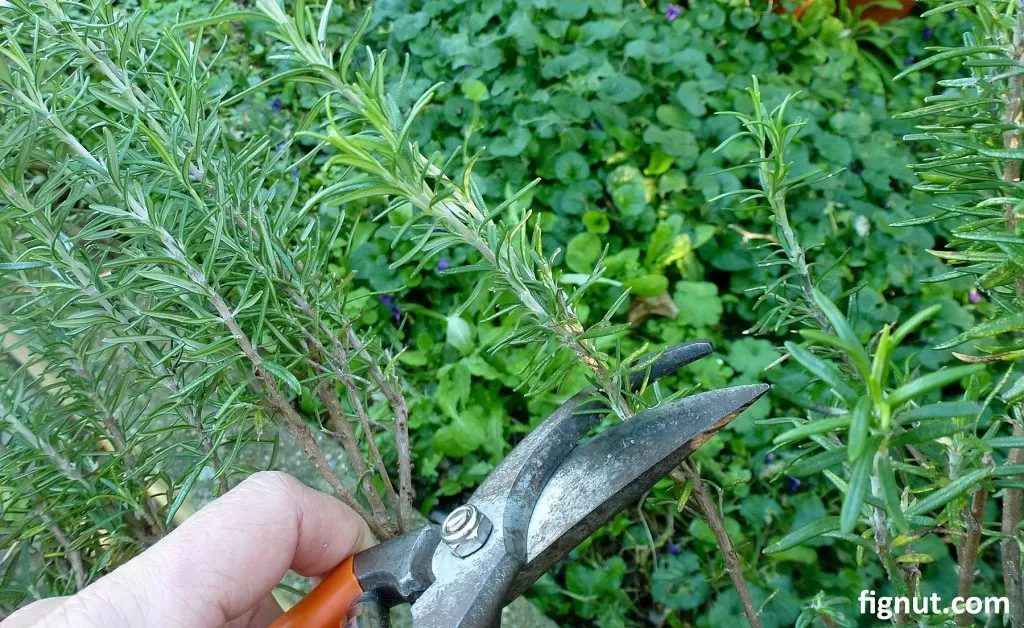
Step 2: Take Your Cuttings
Using clean, sharp pruning shears or scissors, take cuttings that are about 4 to 6 inches (10-15 cm) long. Aim for stems that are softwood or semi-hardwood. Taking slightly more cuttings than you need is always a good idea, as not every single one will root.
 Selecting vibrant green softwood rosemary stems for propagation
Preparing Your Rosemary Cuttings
Once you have your stems, a little preparation goes a long way to encourage root development and prevent rot.
Step 3: Remove Lower Leaves
Carefully strip off all the leaves from the bottom two-thirds of each cutting. This prevents the leaves from rotting when submerged in water and encourages the plant to focus energy on root production rather than maintaining foliage below the water line. You can save these removed leaves to use in cooking! Make a clean, angled cut (around 45 degrees) at the very bottom of the stem, just below a leaf node. This angled cut increases the surface area for water absorption and root growth.
 Stripping leaves from the lower part of a rosemary cutting
Step 4: Gently Flatten the Stem End (Optional but Helpful)
Some gardeners find it helpful to lightly crush or flatten the bottom cut end of the stem. This can potentially expose more tissue and aid in water uptake and root formation. You can achieve this gently with your pruning shears or even a clean hammer.
 Flattening the cut end of a rosemary stem with pruning shears
Water Propagation Method: Step-by-Step
Water propagation is a simple and visual way to root rosemary cuttings, especially when outdoor conditions aren’t ideal.
Step 5: Prepare Your Container and Water
Choose a clean container that can hold water and support your cuttings. Recycled plastic bottles cut in half, glass jars, or even small plastic cups work perfectly. Fill the container about three-quarters full with clean water. Rainwater is often preferred if you have it, as it’s free of chlorine and other chemicals found in tap water, though tap water left out for 24 hours to allow chlorine to dissipate also works.
To keep cuttings upright and prevent them from falling over or fully submerging, you can use a simple support. A piece of plastic mesh (like from fruit or veggie bags) secured over the opening with a rubber band is an easy DIY solution. Push the cuttings through the mesh holes.
Step 6: Dip in Antiseptic (Optional)
Before placing the cuttings in water, you can dip the cut ends in an antiseptic like cinnamon powder or a homemade rooting hormone mixture. While not strictly necessary for rosemary, this step can help prevent fungal diseases or rot in the water, giving your cuttings a healthier start.
 Dipping the end of a rosemary cutting in cinnamon powder as an antiseptic
Step 7: Place Cuttings in Water
Carefully arrange your prepared cuttings in the container, pushing the bottom ends through your mesh support if using one. Ensure that the part of the stem where you removed the leaves is submerged in the water, but none of the remaining leaves are. The mesh or container rim should hold the cuttings upright so the leafy tops are in the air.
 Rosemary cuttings suspended in water using a mesh support
Step 8: Find the Perfect Spot
Place your container of cuttings indoors in a bright location, but away from direct sunlight. A north or east-facing window is often ideal, providing ample light without the intensity that can overheat the water or stress the cuttings. Maintain a comfortable room temperature; avoid cold drafts or overly hot spots. Good air circulation around the plants is also beneficial.
Step 9: Monitor and Maintain
This is where patience comes in! Check your cuttings regularly. Change the water every few days (say, twice a week) to keep it fresh and oxygenated. This is a crucial step for preventing bacterial growth and ensuring healthy root development.
Over the next 6 to 8 weeks (sometimes sooner, sometimes a bit longer, depending on conditions), you should begin to see small white roots emerging from the submerged ends of the stems. Once the roots are about an inch or two long and branching, your cuttings are ready for the next step: potting them up.
What Comes Next: Potting Up Your Rooted Cuttings
When your rosemary cuttings have developed a good network of roots in the water, it’s time to transition them to soil.
Choose small pots (about 4-6 inches in diameter) with drainage holes. Use a well-draining potting mix, ideally one formulated for herbs or cacti/succulents, or mix in perlite or sand to improve drainage. Gently transplant each rooted cutting into its own pot. Be careful not to break the fragile new roots. Plant them at the same depth they were in the water, ensuring the roots are covered and the base of the stem is just above the soil line. Water thoroughly after potting.
Place the newly potted plants in a bright spot, gradually introducing them to more sun if they were in lower light conditions. Keep the soil lightly moist for the first few weeks as the roots establish in the soil, but be careful not to overwater. As they grow, you’ll transition to the typical rosemary watering schedule, allowing the soil to dry between waterings.
My Own Rosemary Propagation Journey
Seeing those first tiny roots appear on a cutting is truly exciting! I remember trying this for the first time, doubting if I could really grow a whole new bush from just a twig. But following these simple steps, I successfully rooted several cuttings. It’s incredibly rewarding to watch them grow from those small beginnings into robust plants that provide fragrant sprigs for cooking year after year. It’s a testament to the plant’s resilience and the magic of propagation.
 Baby rosemary plants successfully grown from cuttings
To Conclude
Learning how to propagate rosemary from cuttings is a fantastic way to easily expand your herb garden, save money, and share the bounty with others. Whether you choose the water method described here or explore soil propagation, the process is straightforward and rewarding. With a few snips, a little patience, and basic supplies often found around the house, you can enjoy a continuous supply of fresh rosemary grown right from your own garden. Give it a try and experience the satisfaction of growing new plants from old!
If you’ve tried propagating rosemary or have any tips to share, let us know in the comments below! And be sure to explore our other articles for more gardening inspiration and guides.