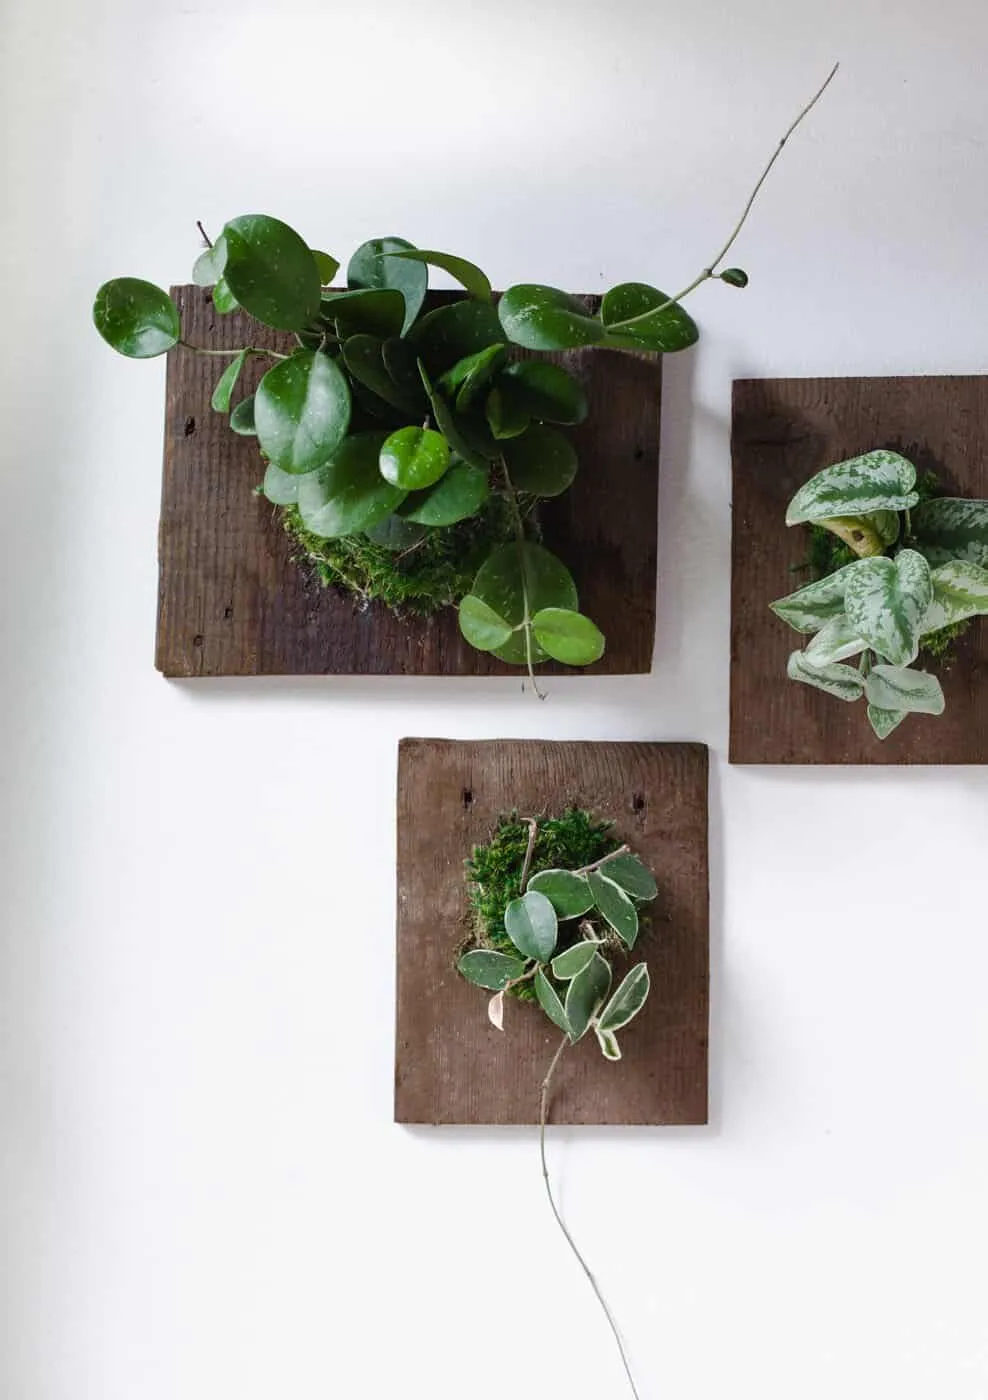
Three different wall-mounted plants displayed together on a white wall, showcasing the concept of living art created with greenery.
Is your home overflowing with beloved houseplants, leaving little room for new additions? Do you gaze at bare walls and wish for a touch of vibrant life? The answer isn’t to stop expanding your plant collection; it’s time to go vertical! Embracing wall-mounted greenery is a fantastic way to add lush beauty, unique style, and that essential connection to nature without sacrificing precious floor or shelf space. It’s more than just displaying plants; it’s creating dynamic, living art that elevates your interior design and brings a breath of fresh air into any room. Forget static pictures – your walls are about to come alive!
Beyond saving space, incorporating wall-mounted plants offers a unique set of advantages. They draw the eye upwards, making rooms feel larger and more open. They serve as striking focal points, transforming plain walls into vibrant installations. This approach also allows you to appreciate the full beauty of trailing or cascading plants as they spill downwards, adding a graceful, dynamic element that a regular pot on a shelf might not capture. Plus, the act of creating and caring for these green masterpieces is incredibly rewarding.
Selecting the right plant is key to a successful wall mount. You’ll want varieties that can thrive with their roots contained within a moss ball and attached to a board, and that don’t require extremely frequent watering or complex root systems.
Here are some excellent candidates often used for wall mounting:
From the original project, specific plants used were:
Before you begin creating your living art, gather everything you’ll need. Most items are readily available at garden centers, craft stores, or hardware stores.
Creating your wall-mounted plant is a straightforward process that’s incredibly satisfying. Follow these steps to turn a potted plant into a piece of living art.
First, you need to make your wooden board ready for hanging. Turn the board over and nail the sawtooth picture hanger securely into the back, towards the top center. This is how your completed plant mount will hang on the wall.
Next, flip the board back over. Place your potted plant on the front of the board to visualize its position. Once you’ve decided where you want the plant’s root ball to sit, use the hammer to drive 8-12 small nails into the board in a circular pattern around that spot. The circle should be slightly wider than the widest part of the plant’s pot. Angle the nails slightly outwards towards the edges of the board; this will help hold the fishing line or twine in place later.
Gently remove the plant from its nursery pot. Loosen the roots slightly and carefully remove most of the excess soil from the root ball. You want a relatively compact root mass that can be easily wrapped in moss. Be careful not to damage the roots unnecessarily.
Place the prepared plant firmly onto the spot you marked on the board, nestling its root ball within the circle of nails. Now, take pieces of sheet moss and begin wrapping them around the exposed root ball and any remaining soil. Press and shape the moss firmly, ensuring it’s contained within the boundary of the nails. This moss layer will help retain moisture. Having someone help hold the plant steady at this stage can be a big advantage.
Cut a length of fishing line or twine, about 3 feet long. Tie one end securely to one of the nails, leaving a few inches of tail that you can use to tie off the line when finished. Begin pulling the line tightly across the moss-covered root ball, hooking it around a nail on the opposite side, then crossing back over to another nail. Continue this process, crisscrossing the line over the plant and hooking it around the nails. Pull the line taut as you go to firmly secure the plant and moss to the board. Go around the nails multiple times if needed until the plant feels stable and well-attached.
Once the plant feels completely secure, tie off the end of the fishing line or twine to the initial tail you left, or to another nail. Trim any excess line neatly with scissors.
Your living art piece is now ready to hang! Find a suitable spot on your wall – considering the light requirements of your chosen plant – and hang the board using the sawtooth hanger. Water your newly mounted plant immediately after hanging it to help the roots settle and the moss hydrate.
Caring for wall-mounted plants is slightly different from caring for potted plants, primarily because the moss medium tends to dry out faster.
Keep a close eye on your mounted plants. Wilting leaves or very dry moss are signs they need water. Yellowing leaves can indicate overwatering or poor drainage (ensure you let the moss ball drain completely after soaking). With a little attention, your wall-mounted greenery will thrive and provide a stunning, unique addition to your home for years to come!
Don’t let limited horizontal space limit your love for plants. Embracing wall-mounted greenery opens up a whole new dimension for decorating with nature. It’s a creative, fulfilling project that results in beautiful, living pieces of art that truly make a statement. With a few basic supplies and these simple steps, you can transform bare walls into vibrant displays and enjoy the endless benefits of having more green friends in your life.
Ready to add some vertical charm to your space? Give wall-mounting a try! Share your results in the comments below or tag us on social media. For more plant inspiration and DIY projects, keep exploring Thelittle.garden!
Wichtigste Erkenntnisse: Der Anbau eigener gemischter Blattsalate bietet unübertroffene Frische und Geschmack – direkt aus…
Here's how implementing no-dig techniques can transform your container gardening: Build Richer Soil: Layers of…
Healthy soil is teeming with beneficial microbes that act as a natural defense system for…
Transform your patio into a vibrant, wildlife-friendly oasis. Discover how to create beautiful, low-maintenance container…
Unlock the secret to a beautiful, resilient garden with Sedum & Yarrow blends. Discover why…
Beat the Heat: Discover resilient perennials that thrive in containers during the hottest summer months,…