How to Grow Plants with Water Crystals
Gardening brings so much joy, a little green corner to escape to. But let’s be honest, life gets busy! Sometimes, keeping up with the watering needs of all your beloved plants feels like a challenge. What if there was a simple solution to help your plants stay hydrated longer, potentially simplify starting new plants, and even add a unique visual touch? Enter water beads, also known as hydrogel crystals – a fascinating medium that can revolutionize the way you approach plant care, especially for water-bead propagation and maintaining thirsty roots.
Contents
At their core, water beads are small, absorbent polymers. You might have seen them sold dried, looking like tiny seeds or granules. Their superpower? They can soak up an incredible amount of water, expanding many times their original size to become soft, squishy gel-like spheres.
Once hydrated, these beads act like miniature water reservoirs. When used in gardening, either mixed with soil or as a standalone medium, they slowly release moisture back into the plant’s root zone as needed. This controlled release offers several benefits: it helps prevent the plant from drying out too quickly between waterings, and conversely, it can help reduce the risk of root rot associated with overwatering. This makes them particularly useful for delicate cuttings or seedlings where consistent moisture is key, laying the groundwork for successful water-bead propagation.
While not a traditional method for all types of propagation (like starting from seed which might struggle with bead size), water beads offer unique advantages, particularly for plants that root easily in water or for transplanting water-rooted cuttings.
Before they can work their magic, those tiny dry granules need to soak up water.
The amount of water beads you need depends on your container size. A general guideline from many manufacturers suggests around one teaspoon of dry beads can hydrate enough for a small pot (like a 2-liter one). Once expanded, two cups of hydrated beads might suffice for the same pot.
Place the dry water beads in a large container. Add a generous amount of water. While room temperature water works fine, warm water can sometimes speed up the hydration process. Check the product packaging for specific water-to-bead ratios, but generally, you want enough water for the beads to fully submerge and expand.
Many instructions suggest a few hours, but for maximum absorption, letting them soak overnight is a good strategy. This ensures they reach their full size and water-holding capacity. Once they’ve expanded, drain off any excess water. Your beads are now ready for action!
Water beads are versatile and can be incorporated into your plant care routine in a couple of ways.
You can mix hydrated water beads into your regular potting soil. This is ideal for established plants that might need a little extra help staying hydrated, or for plants that are sensitive to drying out. A common ratio is about one part hydrated water beads to four parts potting soil.
When incorporating them into an existing potted plant, gently remove the plant from its pot. Carefully remove excess soil from the roots. Place a layer of the soil/water bead mix in the bottom of the pot, ensuring some beads are where the roots will rest or grow into. Place the plant in the pot, spreading the roots slightly over the bead mixture if possible. Fill the rest of the pot with the soil/bead mix. Water lightly after repotting, but rely on the beads to provide consistent moisture going forward.
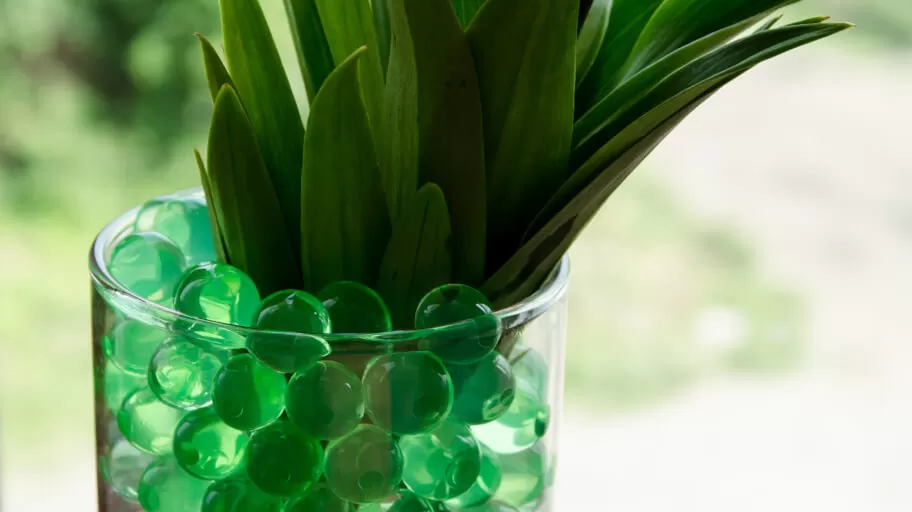
For plants that naturally thrive in water or for rooting cuttings, you can use water beads as a standalone medium in a vase or clear container. This is where the “water-bead propagation” aspect truly shines for cuttings. Simply place the hydrated beads in a clean container, then carefully insert your plant or cutting, ensuring the stem or roots are in contact with the beads.
This method is particularly popular for decorative displays and for plants like Pothos, Spider Plants, and others known for their ability to root in water.
Using water beads to root cuttings is a simple process that offers great visibility and hydration control.
Using water beads is relatively easy, but a few key tips can help ensure your plants thrive.
Water beads provide water, but they lack nutrients. If you are growing plants solely in water beads (without soil), you must fertilize regularly. A weak, diluted liquid fertilizer added to the water you use to rehydrate the beads or applied separately is crucial. Most houseplants grown this way will benefit from fertilizing about once a week or two during their growing season, using a much weaker solution than recommended for soil. Watch your plant for signs of nutrient deficiency (like yellowing leaves) and adjust your feeding schedule as needed.
Over time, even fully hydrated water beads will shrink as the plant absorbs water and evaporation occurs. Simply add more water to the container to rehydrate them. The beads themselves don’t last forever. Their structure will eventually break down. Higher-quality beads might last several years (potentially 4-5 years or even longer) before needing replacement. You’ll know it’s time when they no longer absorb and hold water effectively.
Water beads are a fun and functional addition to the gardener’s toolkit. They work wonderfully for many common houseplants, tropical varieties, and plants that naturally grow in moist conditions or root easily in water. While you can experiment, plants that require excellent drainage or prefer very dry conditions might not be the best candidates for mixing beads into their soil. For water-bead propagation, focus on cuttings known to root well in water. Don’t be afraid to try them out on a few different plants to see what works best in your specific environment!
Water-bead propagation and plant care offer an innovative way to manage moisture, support busy schedules, and add a unique aesthetic to your green spaces. From starting new cuttings in a visible, stable medium to helping established plants stay hydrated longer when mixed with soil, hydrogel beads are a versatile tool. Give them a try and see how these little water wonders can make your gardening life a little easier and a lot more colourful!
Have you tried water beads for propagation or plant care? Share your experiences in the comments below! Looking for more easy-care gardening tips? Explore other guides on our site!
Wichtigste Erkenntnisse: Der Anbau eigener gemischter Blattsalate bietet unübertroffene Frische und Geschmack – direkt aus…
Here's how implementing no-dig techniques can transform your container gardening: Build Richer Soil: Layers of…
Healthy soil is teeming with beneficial microbes that act as a natural defense system for…
Transform your patio into a vibrant, wildlife-friendly oasis. Discover how to create beautiful, low-maintenance container…
Unlock the secret to a beautiful, resilient garden with Sedum & Yarrow blends. Discover why…
Beat the Heat: Discover resilient perennials that thrive in containers during the hottest summer months,…