Creating a magical, snow-kissed Christmas tree is easier than you think. Flocking gives your holiday centerpiece that enchanting winter look, transforming a plain green tree into a festive masterpiece.
Here are the key takeaways for flocking your Christmas tree:
- You can flock both real and artificial trees.
- Preparation is crucial: assemble, fluff, and protect your space.
- You’ll need flocking powder, water, strainers, and protection like a mask and sheeting.
- Apply powder to wet branches, working in sections from top to bottom.
- Use different sifter sizes for main coverage and touch-ups.
- A final misting sets the flock, but allow ample drying time before decorating.
- Flocking is relatively low-mess if you prepare properly, but expect some residue.
- The flocking is permanent once dry, though touch-ups might be needed annually.
For years, I’ve dreamt of that soft, snowy look on my Christmas tree. You know the one – where the branches seem delicately dusted or even heavily laden with fresh snow, glistening under the lights. While there are beautiful pre-flocked trees out there, sometimes you just want to give your existing tree a fresh, wintery update. I experimented with creative solutions in the past, like tucking in snow-covered branches or even using white feather boas to mimic the look.

Simulating snow with natural elements like snow-covered branches can add a beautiful texture and dimension, bringing the outdoors in for a cozy feel.

Trying different methods, like using white feather boas, offers another way to create a soft, snowy effect for a whimsical tree display.
But the idea of true flocking lingered. This year, I finally decided to dive in and learn how to flock a Christmas tree properly. And let me tell you, it was surprisingly simple! The results were exactly what I’d hoped for, and honestly, I wish I hadn’t waited so long. If you’re ready to transform your tree, this guide will walk you through exactly how to flock a Christmas tree yourself, with all the tips and tricks I picked up along the way.
Contents
- Gathering Your Flocking Supplies
- Essential Materials
- How to Flock Your Christmas Tree: Step-by-Step
- Step 1: Prepare Your Tree
- Step 2: Protect Your Space
- Step 3: Wet the Branches
- Step 4: Sift the Flocking Powder
- Step 5: Fill in Gaps
- Step 6: Final Set and Drying
- Decorating Your Flocked Tree
- Expert Tips for Perfect Flocking
- Common Questions About Flocking a Tree
- Can You Flock a Pre-Lit Tree?
- How Much Flocking Powder Do I Need?
- Does Flocking Dim the Lights?
- Is Flocking a Tree Messy?
- Does Flocking Fall Off?
- Can More Flocking Be Added Later?
- Does Flocking Come Out of Clothes?
- Conclusion
Gathering Your Flocking Supplies
Before you embark on your flocking adventure, make sure you have everything you need ready. Having your supplies at hand will make the process smooth and enjoyable.
Essential Materials
- Flocking Powder: This is the magic ingredient! Choose a powder specifically designed for flocking trees. I found powder gives a much more natural, layered snow look compared to sprays.
- Mesh Strainers: You’ll want at least two sizes – a larger one for broad coverage and a smaller one for detail work and filling in sparse areas. Simple kitchen strainers work perfectly.
- Bowl: Keep a bowl handy to hold your flocking powder while you’re sifting. This prevents spills and makes refilling your strainer easy.
- Spray Bottle: A standard spray bottle filled with water is essential. A larger one means fewer refills, but any size will do.
- Mask: Protect your lungs! Flocking powder is fine and dusty, so wear a mask to avoid inhaling it.
- Plastic Sheeting or Drop Cloths: This is crucial for protecting your floor, walls, and furniture, especially if you’re flocking indoors. Trust me, this step saves a lot of cleanup!

Having the essential supplies laid out, including flocking powder, mesh strainers, spray bottle, and protective gear, is the first step towards a successful DIY flocked Christmas tree project.
How to Flock Your Christmas Tree: Step-by-Step
Ready to get that gorgeous snow-kissed look? Follow these steps for a beautifully flocked tree.
Step 1: Prepare Your Tree
Whether you’re flocking a fresh-cut tree or breathing new life into an artificial one, preparation is key. For artificial trees, fully assemble and fluff the branches before you start flocking. Arrange them exactly how you want them to look when decorated.
Fluffing first ensures the flocking powder lands on the upward-facing parts of the branches, mimicking how snow naturally falls. It also minimizes the need to move or bend branches after flocking, which can dislodge the powder.

Set up your artificial Christmas tree and ensure all branches are properly fluffed and positioned before you begin the flocking process to achieve the best coverage.
Step 2: Protect Your Space
Flocking can be a bit messy, so protect your surroundings. If possible, flock your tree outside on a calm day. If flocking indoors (which I did to avoid moving a freshly flocked tree!), cover your floors, walls, and furniture with plastic sheeting. You can even wrap the sheeting around the base of the tree for extra containment. Yes, it might look a bit like a scene from a movie, but cleanup will be infinitely easier!

Protecting your living space with plastic sheeting around the artificial Christmas tree is a necessary step to contain mess when flocking indoors.
Step 3: Wet the Branches
Working from the top of the tree down, lightly mist the branches with water from your spray bottle. You want the branches to be damp, not dripping wet. Think of it like giving the branches a light morning dew.
I found it helpful to work in sections – maybe one large triangle area at a time. As the flocking powder falls, the misted branches below will catch any stray bits, putting them to good use instead of letting them just fall to the floor.

Mist the branches of your Christmas tree thoroughly with water from a spray bottle; the dampness helps the flocking powder adhere properly for a snowy look.
Step 4: Sift the Flocking Powder
Fill your large strainer no more than half full with flocking powder. Holding the strainer over a misted section of the tree, begin shaking it gently. At the same time, use your other hand to lightly mist the powder as it falls. This second misting helps the powder clump and stick more effectively to the branches and itself, creating a more natural snow texture.
Shake the powder straight down rather than side to side to avoid clumps and ensure an even distribution. Start at the top of the section you just misted and work your way down. How much powder you sift is up to you – for a light dusting, use less; for a heavy snow look, apply more. I aimed for a light dusting, focusing more on the tips and tops of branches, just like real snow would settle. Be careful not to spray the sifter itself, as this can clog it!

Combine sifting flocking powder from a mesh strainer with simultaneously misting water from a spray bottle to ensure the powder clings effectively to the branches.
Step 5: Fill in Gaps
After the initial pass, you might notice areas that are less covered, or perhaps your tree’s branches are uneven and some spots were missed entirely by the falling powder. This is where your smaller strainer comes in handy.
Lightly mist the specific branches or areas you want to touch up. Then, using the small sifter, gently sprinkle flocking powder onto those spots. For these detailed areas, you can often skip the second misting as the powder falls, as the branches are already damp, and you don’t want to accidentally create overly thick spots below. Remember, nature isn’t perfectly uniform, so don’t feel the need to cover every single needle identically!

Use a smaller mesh strainer for precision when applying flocking powder to fill in sparse areas or touch up specific branches on your Christmas tree.
Step 6: Final Set and Drying
Once you are happy with the coverage and your tree looks beautifully snow-kissed, give the entire tree one final, slightly heavier misting of water. This is the crucial step that “sets” the flocking powder, essentially gluing it permanently to the branches.
Now comes the hard part: patience! The flocking needs to dry completely before you can safely decorate. Drying time varies depending on humidity and how heavily you flocked, but it typically takes 24 to 72 hours. Check the flocking in a few spots to ensure it’s hard and dry before moving on. My lightly flocked tree was ready after about 24 hours. The result was a stunning, natural-looking snow effect that brought my tree to life.

The artificial Christmas tree stands beautifully flocked with a light layer of snow, fully dried and ready to be adorned with festive decorations.

Observe the texture and coverage achieved by applying flocking powder, creating a realistic snow effect on the individual branches of the artificial tree.
Decorating Your Flocked Tree
With your tree transformed into a winter wonderland, decorating becomes even more magical! The white flocking provides a beautiful backdrop for your ornaments and lights. I chose a palette of neutral silvers, golds, and whites, paired with soft blue ribbons, to complement the snowy look without overpowering it.

Selecting ornaments in shades of gold, silver, and white provides a classic, elegant look that beautifully complements a flocked Christmas tree.
Adding ribbon, garlands, and your favorite ornaments completes the transformation, making your flocked tree the stunning centerpiece of your holiday decor.
The finished decorated flocked Christmas tree, adorned with coordinating ribbons and a mix of gold, silver, and white ornaments, creates a festive focal point.
Expert Tips for Perfect Flocking
Here are a few extra nuggets of wisdom I gathered during my flocking project:
- Shake Down, Not Across: When sifting powder from the strainer, shake vertically (up and down) rather than horizontally (side to side). This helps the powder fall evenly and reduces the chance of clumps forming.
- Dominant Hand Precision: Use your dominant hand for the sifting part. You’ll likely have better control over where the powder lands.
- Removing Dry Excess: If you get a bit too much dry powder on a branch before the final misting, don’t try to wipe or smear it – that creates a sticky mess once wet. Instead, gently flick the branch with your finger to knock the excess off. Once the final misting is done, the powder is set.
- Turn Off HVAC: Make sure your heating or air conditioning system is off while you’re flocking. A sudden gust of air can send the fine powder everywhere!
- Mimic Nature: For the most natural look, apply more flocking powder to the top branches and the outer tips of the branches, where snow would naturally accumulate. Less is often more towards the trunk.
- Cleaning Clogged Strainers: If you accidentally spray water into your sifter and it clogs, you can use a stiff brush (like a potato brush) to scrub it clean. If you wash it, ensure it’s completely dry before using it with powder again.

Sometimes you might accidentally apply too much flocking powder to a section of a branch, resulting in noticeable clumps before it’s set.

Gently flicking a Christmas tree branch with your finger is an effective way to remove excess dry flocking powder before it is set with a final water mist.
Common Questions About Flocking a Tree
You likely have a few questions bubbling up as you consider flocking your own tree. Here are answers to some of the most common ones:
Can You Flock a Pre-Lit Tree?
Absolutely, yes! Most flocking powders are safe for pre-lit trees, especially those with UL-certified lights. Always check the flocking product’s instructions to be sure. The crucial safety step is to ensure the lights are off and unplugged while you are flocking and remain off until the tree is completely dry. Remember, you are misting, not soaking, the tree, so there’s minimal risk to the lights once everything is dry.
How Much Flocking Powder Do I Need?
This depends on the size of your tree and your desired level of “snowiness.” Flocking powder packaging usually gives an estimate. For example, a 2lb bag might moderately flock a 7-foot tree. For my 7.5-foot tree, I used less than a quarter of a 2lb bag to achieve a light dusting. If you want a heavily flocked look, you’ll need significantly more. It’s often better to buy a little extra than run out mid-project.
Does Flocking Dim the Lights?
The effect is usually minimal. While some flocking might land directly on the bulbs, the light still shines through. The beautiful glow of the lights reflecting off the white flocking often more than makes up for any slight dimming of the bulb itself. If you’re really concerned, you could individually tape off each light before you begin, but for most people, this isn’t necessary.
Is Flocking a Tree Messy?
Honestly, it’s not as bad as you might imagine, provided you prepare properly. Flocking outdoors on a calm day is ideal. If doing it indoors, the plastic sheeting is your best friend. Dry powder vacuums up easily. Once the powder gets wet and sets, it becomes sticky. Any wet flocking that lands on your protective sheeting will stay there. Wear old clothes and maybe even socks you can easily remove at the door to avoid tracking sticky residue through your house.
Does Flocking Fall Off?
Once the flocking powder is applied and has been set with the final misting of water and fully dried, it adheres quite well. You won’t have clouds of snow falling off every time you touch a branch. However, expect a small amount of shedding, especially when you first set the tree up or when you’re adding or removing ornaments. This is minimal, though. Keep in mind that once a tree is flocked, it retains that flocking. You can’t easily remove it completely and return to a plain green tree.
Can More Flocking Be Added Later?
Yes! If you decide you want a heavier snow effect or notice a spot you missed, you can always go back and add more flocking. Simply repeat the process for those specific areas: mist the branch, apply more powder with a sifter, and finish with a light mist on that section to set it.
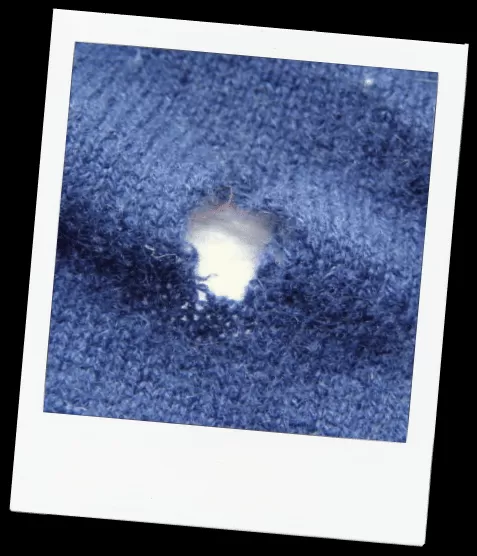
Does Flocking Come Out of Clothes?
In my experience, yes! Any dry powder brushes off easily. If you get sticky, wet flocking on fabric, let it dry completely and then wash the item as usual. I was surprised how easily a patch of sticky flocking came off my sweatpants in the washing machine.
Conclusion
Flocking your Christmas tree is a rewarding project that can completely change the look and feel of your holiday decor. It’s a straightforward process that, with a little preparation, is accessible for any DIY enthusiast. You can create a tree that looks like it was just brought in from a winter wonderland, ready to be adorned with your favorite lights and ornaments.
Have you flocked a tree before, or are you planning to try it this year? Share your experiences or questions in the comments below! We’d love to hear about your snowy tree transformations. For more garden, landscape, and decorating ideas, be sure to explore other articles on Thelittle.garden.