- Polka dot plants are easy to propagate, especially during spring and summer
- You can propagate using stem cuttings in water or soil
- Basic tools needed: sharp scissors, glass container or well-draining soil mix
- Proper care post-propagation is crucial for successful growth

Polka dot plants, with their vibrant, speckled foliage, are a delightful addition to any indoor garden. If you’ve fallen in love with these charming plants and want to expand your collection without breaking the bank, you’re in luck! Propagating polka dot plants is surprisingly simple and rewarding. In this guide, we’ll walk you through the process step-by-step, sharing tips and tricks to ensure your propagation success.
When to Propagate Polka Dot Plants
Timing is everything when it comes to successful propagation. The best time to propagate your polka dot plant is during its active growing season, which typically begins in early spring. As the days grow longer and temperatures rise, your plant enters a period of vigorous growth, making it the perfect time to take cuttings.
Sarah Green, a seasoned horticulturist, explains, “Spring and summer are ideal for propagating polka dot plants. The warm temperatures and increased daylight hours create optimal conditions for root development.”
However, don’t let cooler months discourage you. With a little extra care, you can still propagate successfully year-round. Simply provide your cuttings with a warm, bright spot or use a heating mat to encourage root growth.

Essential Tools for Propagation
Before you begin, gather these basic items:
- Sharp, clean scissors or pruning shears
- A glass container or propagation station (for water propagation)
- Well-draining potting mix (for soil propagation)
- Small pots with drainage holes
Step-by-Step Propagation Guide
Step 1: Selecting the Perfect Stem
Choose a healthy stem with several sets of leaves. Look for:
- Vibrant, spotty foliage
- A thick, green stem
- No signs of pests or disease
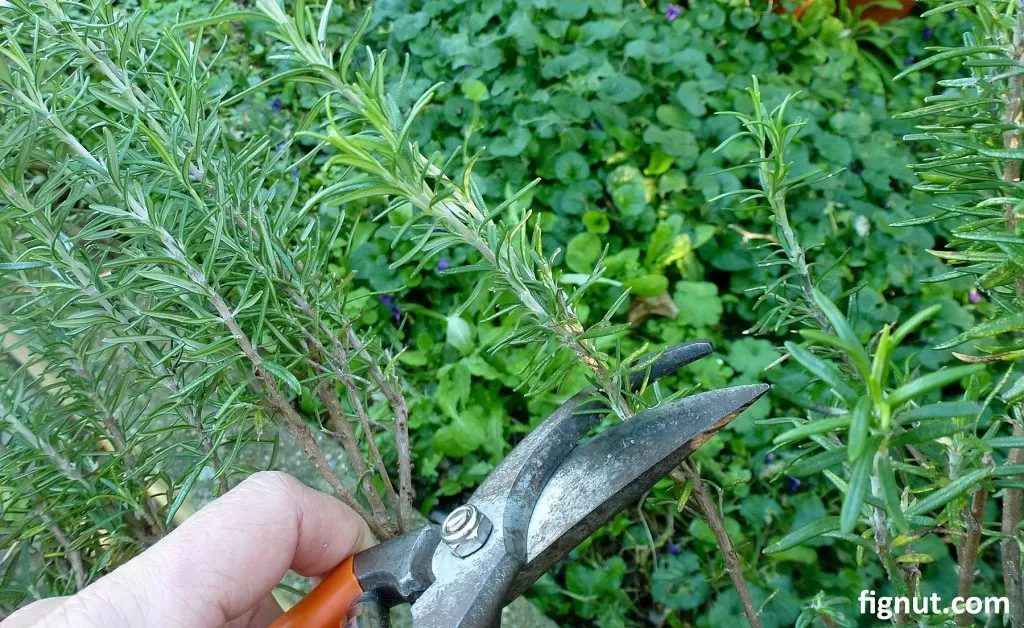
Step 2: Taking the Cutting
- Cut a 4-inch section of stem, ensuring it has at least three sets of leaves
- Remove the bottom set of leaves, exposing the node
- Make a clean cut just below a node

Gardening expert Tom Brown advises, “Always use clean, sharp tools to prevent damaging the stem or introducing diseases. A clean cut promotes faster healing and root development.”
Step 3: Rooting Your Cutting
You have two options for rooting your polka dot plant cutting: water or soil.
Water Propagation
- Fill a glass container with clean water
- Place the cutting in the water, ensuring the node is submerged
- Position the container in a bright, indirect light location
- Change the water weekly to prevent bacterial growth
Soil Propagation
- Prepare a well-draining mix of equal parts peat moss and perlite
- Make a small hole in the moistened soil
- Insert the cutting, ensuring the node is buried
- Gently press the soil around the stem to secure it
- Water thoroughly and place in bright, indirect light
Step 4: Caring for Your Cuttings
Proper care is crucial for successful propagation. Follow these tips:
- Maintain consistent moisture (but avoid waterlogging)
- Provide bright, indirect light
- Keep the temperature between 65-75°F (18-24°C)
- Mist the leaves occasionally to increase humidity
Horticulturist Emma Davis shares, “Patience is key when propagating polka dot plants. While you may see roots developing within a week or two, it can take up to a month for substantial growth. Stay consistent with your care routine, and you’ll be rewarded with healthy new plants.”
Step 5: Transplanting
Once your cuttings have developed a strong root system (usually after 3-4 weeks), it’s time to transplant them into their permanent homes.
- Gently remove the rooted cutting from water or soil
- Plant in a small pot with well-draining potting mix
- Water thoroughly and place in bright, indirect light
- Gradually acclimate the new plant to its environment over a week

Common Propagation Challenges and Solutions
Even with the best care, you may encounter some challenges. Here are some common issues and how to address them:
- Yellowing leaves: This could indicate overwatering. Reduce watering frequency and ensure proper drainage.
- Leggy growth: Increase light exposure gradually to promote compact growth.
- Slow root development: Try using a rooting hormone to stimulate growth.
Propagating polka dot plants is a fun and rewarding way to expand your indoor garden. With a little patience and care, you’ll soon have a collection of these charming, colorful plants to enjoy or share with friends. Remember, each propagation attempt is a learning experience, so don’t be discouraged if your first try isn’t perfect. Keep experimenting, and you’ll soon become a polka dot plant propagation pro!
We’d love to hear about your propagation experiences! Share your successes, challenges, and tips in the comments below. And if you found this guide helpful, don’t forget to share it with your fellow plant enthusiasts. Happy propagating!